Showing posts with label Dessert. Show all posts

Saturday, August 23, 2014

Blueberry & Lavender "Lumples"

Two years ago, right before Richard and my wedding, I met the most lovely woman named Kathy, who just so happened to be from Virginia. Since my soon to be husband was also from the south, we became fast friends due to her constant insisting that since I was NOT from the south, she  had to teach me how to bake just like a proper southern lady. You see, Kathy is seriously one of the best bakers I have ever met. Not just someone who can follow a recipe and actually remember to include all of the ingredients, a skill that I sadly lack... but she could whip up a perfect pie, decadent brownies, and impressive desserts. You name it, she could bake it!

I immediately started joining Kathy in her home on Saturday mornings for my weekly lady lessons, as we liked to call them. I learned how to properly make pimento cheese, bagels, pies, and my very favorite treat to date, "Lumples." Well, that's what she called them. A sort of scone, muffin, pastry lump-of-a-thing which is stuffed with fresh blueberries and smells of heavenly lavender. Like me, they are slightly hard on the outside, flaky and delicate on the inside, and just slightly, perfectly sweet. And I mustn't forget the glaze. Ah, the glaze. They are drizzled with a light meyer lemon glaze that adds the slightest taste of sour. And there you have it. A lumple. The kind you'd never want to have removed. I love them.


Blueberry & Lavender "Lumples"


Ingredients:
Makes about 8 Lumples

2 cups unbleached King Arthur all purpose flour (Kathy said King Arthur is the ONLY flour to use.)
1 teaspoon kosher salt
3 teaspoons baking powder
3 tablespoons sugar
1 teaspoon dried lavender buds
1 egg 
3/4 cup whole milk
7 tablespoons chilled, unsalted butter

Method:
Preheat oven to 375 degrees and line baking sheets with parchment paper.

In a large bowl, sift flour, sugar, baking soda, and salt together. 

Cut the chilled butter into small pieces and blend together with your fingers until the mixture resembles course corn meal.

Mix in the dried lavender buds. You can find these in the spice aisle at Whole Foods and other nice grocery stores. 

Add the egg and the milk and mix quickly with a fork until just combined. Do not over mix or the lumples will become dense. 

Drop large spoonfuls of the dough onto the prepared cookie sheets, about two inches apart. The dough can be kind of messy. Then, once the lumples are formed, add several blueberries to each lumple by lightly pushing them into the lumple so that they will stay in place while baking. You don't want to mix the blueberries into the mixture before forming the lumples because the berries will get mushy and mix into the dough. 

Bake 15-20 minutes until just slightly golden. 

Meyer lemon glaze:
2/3 cup confectioner's sugar (sifted well)
6 tablespoons of butter at room temperature
Juice of 1 Meyer lemon

Mix well until smooth. If the glaze is too thick to drizzle, add another tablespoon of softened butter.

Drizzle with the Meyer Lemon Glaze onto the lumples immediately after removing them from the oven. The heat will make the glaze melt perfectly over the lumple. 

Enjoy!


Thursday, August 21, 2014

Summertime Peach Cobbler

GAHHH, why isn't EVERYTHING made out of peaches?! It's the peak of summer and I cannot think of a single food that I love more.

I love peaches.

SO SO MUCH!

They're a real peach.  I guess that's where that saying comes from.

You can grill them, you can put them in salad, you can make my very favorite desserts out of them.  You can bob for them. You can eat them with a man named Bob. They'd even brighten up some corn on the cob. (Sorry, I momentarily channeled Dr. Seuss there. I'm on a peach sugar high). Anyway, there is really nothing that a peach can't make better. Even RK, who claims that he has always disliked peaches, now loves them. They are perfect. We are in love. WE are a real peach.

I am also in love with this cobbler recipe. It is SO simple. Nothing fancy. It just focuses on the flavor of the peaches and the simplicity of a perfect pastry topping. Just use very ripe, fresh peaches and you will have the perfect summertime dessert! Rich's grandmother's china is optional, but encouraged.


Ingredients:

For the peaches
8 fresh peaches, peeled, and sliced into thin wedges
1/4 cup white sugar
1/4 cup brown sugar
1/8 teaspoon freshly ground nutmeg
1/4 teaspoon ground cinnamon
2 teaspoons cornstarch
1 teaspoon fresh lemon juice

For the pastry
1 cup flour
1/4 cup brown sugar
1/4 cup white sugar
1 teaspoon baking powder
1/2 teaspoon kosher salt
6 tablespoon chilled butter cut into small cubes
1/4 cup boiling water

For the topping
3 tablespoons white sugar
1 teaspoon ground cinnamon
Flaky sea salt (optional)


Method:
In a large mixing bowl, combine peeled and sliced peaches, 1/4 cup white sugar, 1/4 brown sugar, cinnamon, nutmeg, lemon juice, and cornstarch. Toss everything together until the peaches are coated evenly. Pour into a greased baking dish and bake in an oven preheated to 425 degrees for about 10 minutes.

While the peaches are baking, in another large bowl, combine flour, remaining sugars, baking poser, and salt. Using your fingers or a pastry blender, cut in the chilled butter and blend until the mixture resembles course meal. Stir in the boiling water until just combined.

Remove the peached from the oven and top with spoonfuls of the pastry topping. Sprinkle the entire cobbler with the cinnamon and sugar mixture. Bake until the topping is golden and the peaches are bubbling, about 40 minutes.

Remove the cobbler from the oven and sprinkle with flaky sea salt. This is totally optional, but I did it and it was delicious.

Serve warm with vanilla bean ice cream!


Tuesday, June 10, 2014

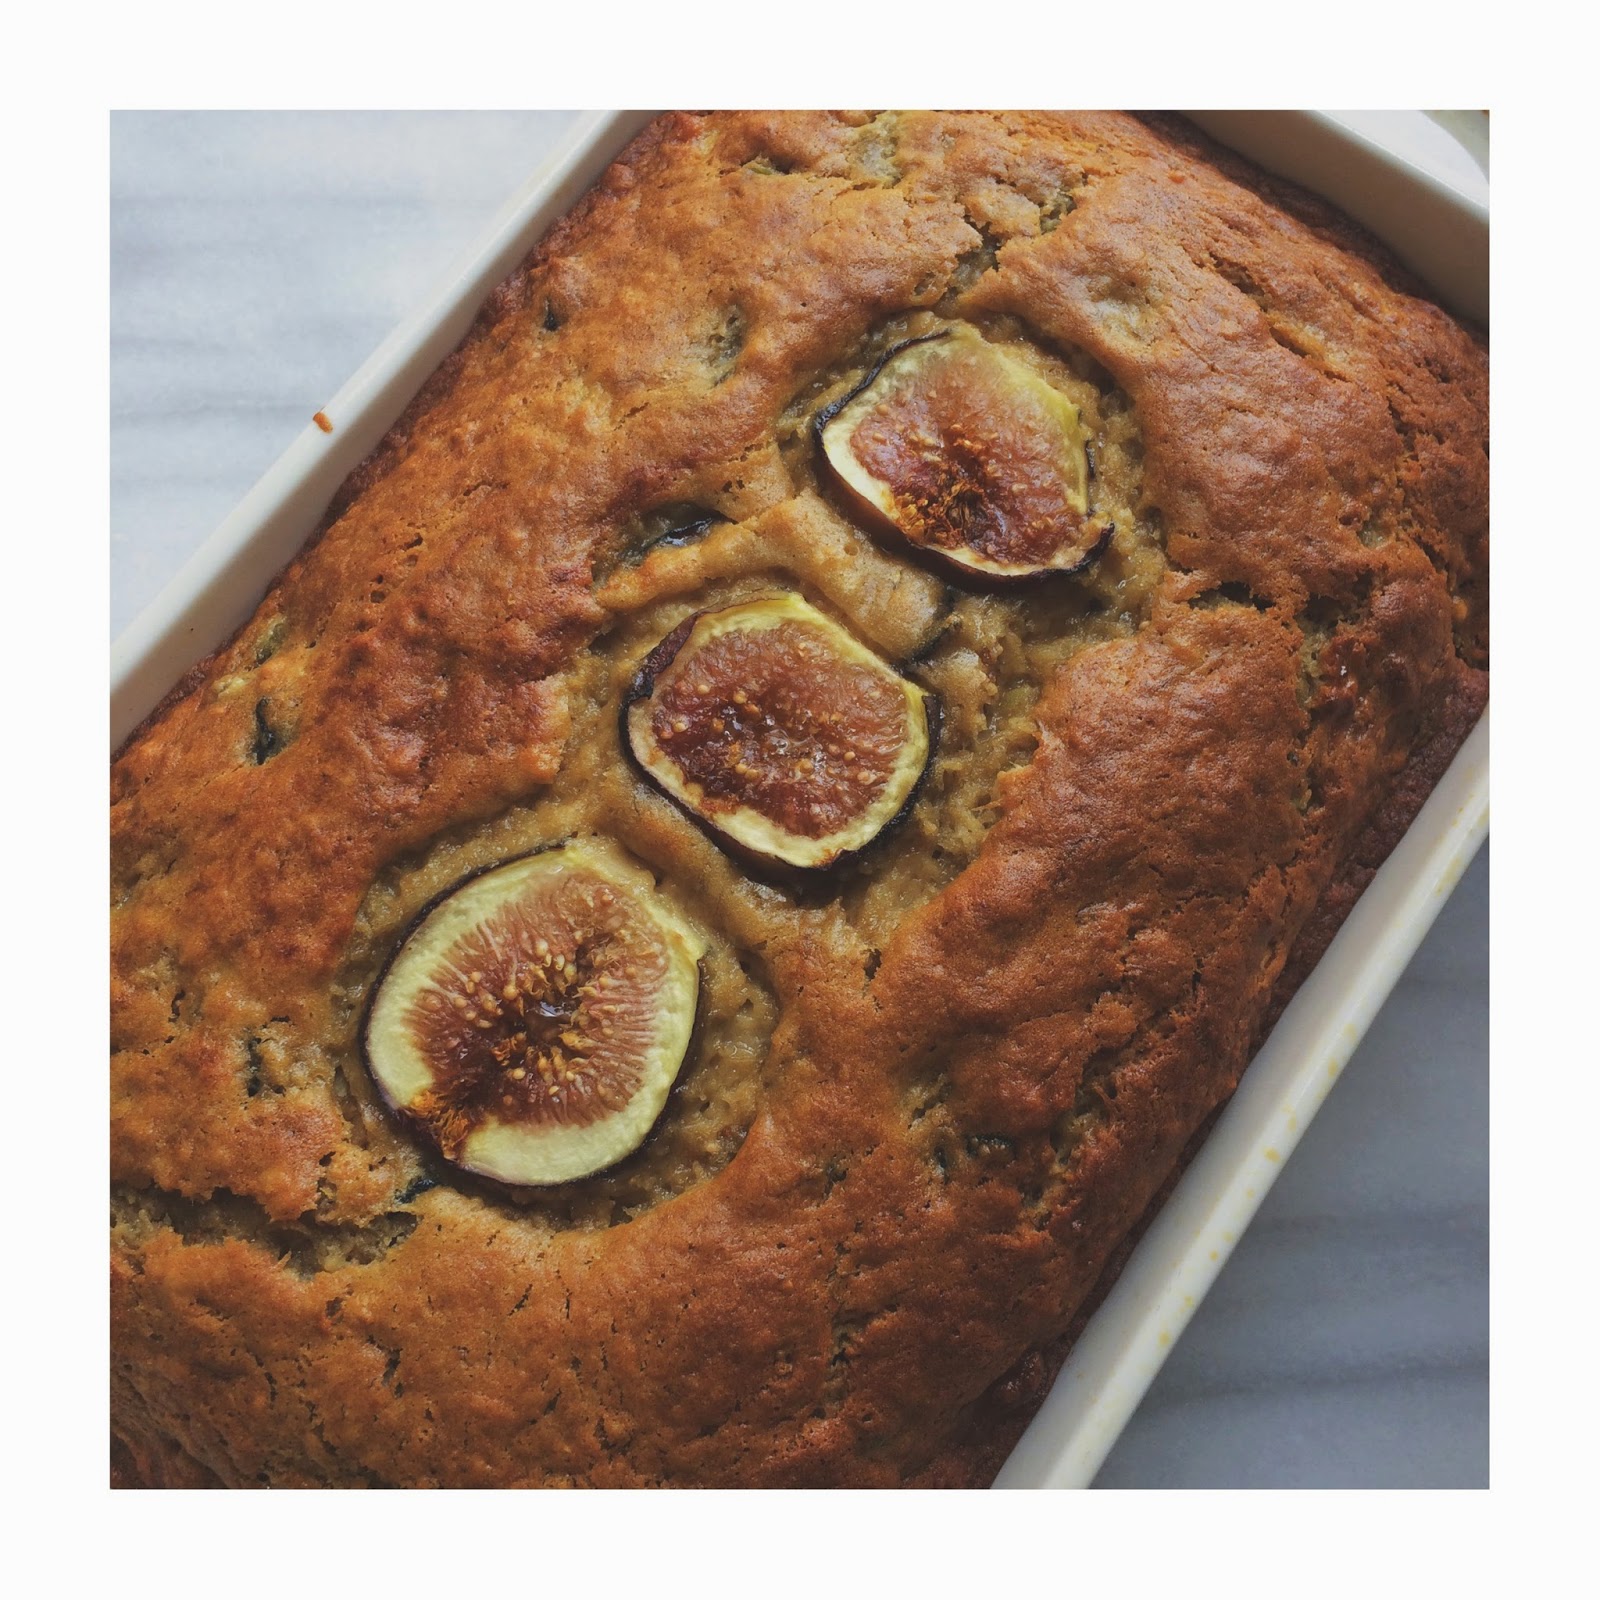
Banana Bread with Fresh Figs

It's very rare for me to meet a carb that I don't thoroughly enjoy. Who am I kidding... I have NEVER met a carb that I don't love! Pasta, breads, baked goods.... bring it. That is why me going on a no carb diet is very very disheartening. But, it is summertime and sometimes these things must be done because bikinis must be worn.

The upside? Lots of healthy carb free recipes coming your way. 

The downside. Well, everything that has to do with me and my own quality of life. 

Sigh. But, since I will not be starting this nonsense until Friday, I figured I would squeeze a couple more mouthwatering, carb filled recipes in!

I loveeeee banana bread. A bread with fruit in it? Love it, love it, love it! I also love figs, though I rarely know what on earth to do with them! This recipe is great because the figs not only compliment the flavor of the bananas, but they also add a great texture to the bread and when paired with the coconut oil, keep it incredibly moist! 


Ingredients:
3 very ripe mashed bananas 
1/2 cup coconut oil, melted
1 cup brown sugar
1 1/2 teaspoons pure vanilla extract
4 ripe figs, quartered and mashed
6 ripe figs, chopped
2 eggs
1 teaspoon baking soda
1 teaspoon baking powder
1/2 teaspoon salt
2 cups all purpose flour


Method:
Preheat your oven to 350 degrees. 

In a large bowl, combine mashed bananas, mashed figs, melted coconut oil, brown sugar, and vanilla. Mix well and then beat in the eggs one at a time, mixing until combined. 

In a separate bowl, combine the baking soda, baking powder, salt, and flour. 

Add the flour mixture to the banana mixture, mixing until just combined. Then, fold in the chopped figs, mixing very gently so that they do not get broken down. 

Pour batter into a greased loaf pan and bake for 45- 50 minutes. 

Let cool before slicing. 


Friday, June 6, 2014

Buttermilk Baked Doughnuts

Happy doughnut day! (Yes, that is actually a day....)

I made classic glazed doughnuts a while back (recipe HERE) and while they were super fun to make, I decided that I am actually much more of a baked doughnut fan. They are a bit healthier (around 150 calories!), and much less time consuming to make. So, in honor of doughnut day, get baking! 


Cinnamon and Sugar Buttermilk Baked Doughnuts


Ingredients:
Nonstick cooking spray
1 cup all purpose flour flour
1 cup whole wheat flour
1/2 cup granulated sugar
1 1/2 teaspoons baking powder
1/2 teaspoon salt
3/4 cup low-fat buttermilk
2 large eggs
1/4 cup honey
2 tablespoons melted butter
1 tablespoon vanilla extract

For Topping:
Equal parts cinnamon and sugar


Method:
Preheat oven to 425°. Lightly coat a doughnut pan with cooking spray.
Combine flours and ingredients through salt in a large bowl, stirring well with a whisk.
Combine buttermilk, eggs, honey, butter, and vanilla, stirring well with a whisk. 
Add buttermilk mixture to flour mixture; whisk just until combined. 
Spoon batter into doughnut pans, filling two thirds full. 
Bake in middle of oven until doughnuts spring back when touched and are golden on bottom (about 8 minutes). 
Let cool in pan slightly, about 4 minutes, and then remove doughnuts carefully from the pan. 
While the doughnuts are still warm, roll them in cinnamon and sugar mixture to coat.


Wednesday, June 4, 2014

Fudgesicles!

Remember when you were a kid and your mom would strip you down to your undies and send you out into the backyard with a popsicle in one hand, which would of course turn you into a stick mess from head to toe, and a water gun in the other, eventually bringing your brothers to their watery death? Ok, so that was my mom and my childhood, but it was a good one and my brothers DID deserve to die. Growing up in Arizona, we would literally spend every waking hour outside in the pool, running through the sprinklers, and trying to drown each other with the garden hose. Without water, there is no life... especially during an Arizona summer. Or an Arizona winter. Or any time in Arizona. It's a friggin' desert. I am sure that most of us have our most fond childhood memories of summer because being a kid in the summertime is the very best time to be a kid! No school, loose bedtimes and all the icy, sweet treats you can handle! Sounds a lot like my life now.... you know, no school, very loose bedtimes and I usually lose count of how many popsicles I consume in a day when it is hot outside. Seriously, there are popsicle sticks piling up everywhere. And I am a sticky, blonde mess.

I have always been a sucker for fudgesicles (once you go fudge, it's hard to budge), but lemme tell you.... those things are filled with more crappy ingredients than a box of blue box blues (also delicious...) And while they may only be 100 calories, I would rather put 157 calories of pure organic sugar in my body than all of that crap... Because I live in Los Angeles, love Gwyneth Paltrow, and have lots of free time on my hands. Plus, I took the time to read the ingredient label. I'm still sounding out half of the words...

"nonfat milk, sugar, corn syrup, whey, high fructose corn syrup, water, palm oil, cocoa processed with alkali, tricalcium phosphate, mono and diglycerides, cellulose gum, guar gum, malt powder, salt, polysorbate 80, polysorbate 65, carrageenan" 

Yup..... Those are the ingredients in one fudgesicle! Am I crazy or should the ingredients be far more simple? Perhaps "fudge" and "sicle" would do? Since I couldn't find any pre-made sickle's I came up with my own recipe consisting of milk, sugar, chocolate, vanilla, butter, and cornstarch. That's it!

So, break out your popsicle molds! These fudge popsicles are creamy, chocolatey, and made from scratch! NOTE: No brothers were harmed in the making of this recipe.


Fudgesicles!


Ingredients:
1/4 cup semi-sweet chocolate chips
2/3 cup granulated sugar
2 tablespoons cornstarch
3 tablespoons unsweetened all natural cocoa powder
2 1/2 cups organic whole milk 
1 teaspoon pure vanilla extract
1 tablespoon unsalted butter 

Popsicle mold
Sticks

Method:
Combine chocolate chips, cocoa powder, milk, sugar, and cornstarch in a medium saucepan. Heat over medium heat, stirring constantly, until all ingredients are melted and combined. Continue stirring until the mixture has thickened, about 10 minutes. Remove from heat and stir in butter and vanilla extract. 

Let the mixture cool for about 30 minutes. Pour into popsicle molds, insert sticks, and freeze until completely frozen before serving! 

Enjoy!


Cantaloupe Sorbet

Hellllllo Summer!

While most years I feel like I greet summer with a bit of a scowl, I am beyond ready for it this year! I have been missing BBQs and bikinis and ice cream like nobodies business. I have even died my hair blonde to be more like the sun. Yes, that is correct. I am a ginger no more! So, what now? Am I blonde in the kitchen? The answer is no. I am ginger in my soul and in my roots (which are very visible thanks to the super cool dye job from Mary) and therefor, a ginger in the kitchen I shall remain. (Though Rich insists I be blonde everywhere else).

With the heat of summer on its way (who am I kidding... the heat is HERE), I figured there is no better time than now (after a slight 2 month vacay from my blog. Oops...) to start diving into some fun summer recipes! There is nothing that tickles my fancy more than homemade ice cream, but this is the first time I have made sorbet! Shocking, I know. It had just never even crossed my mind, but I am so glad that it did because holy hot weather, this sorbet is AMAZING and makes me so excited to start trying some new flavors. It is so easy to make and requires very few ingredients, so no sweaty trip to the market needed!


Cantaloupe Sorbet

Ingredients:
1 small cantaloupe melon
1/4 cup  sugar
2 tablespoons organic honey
Juice of 1/2 lemon

Method:
Remove the rind and seeds, and chop the melon into 1 inch cubes. Toss with sugar and honey and let sit for about 30 minutes. Place melon and sugar in a blender and blend until very very smooth. Add lemon juice to taste and freeze in an once cream maker according to the manufacturers instructions. Place in the freezer to finish freezing. 

Enjoy!


Friday, April 18, 2014

Olive Oil Cake with Vanilla Gelato and Balsamic Reduction

I'm not going to lie... I have been skeptical for a while on this one. I don't question many italian dishes. In fact, I don't really question anything Italian! My favorite foods, favorite wines, and my favorite men are all italian, which are pretty much the most important things in a girl's life.  Butttt, olive oil? In a cake? Meh.

Then I remembered a stop that Richard and I made while we were traveling through Modena, Italy. We were lucky enough to take a private tour of Villa San Donnino, where we learned about the process of making "Aceto Balsamico Tradizionale." At the end of our tour, we enjoyed a tasting of several different vinegars aged 6, 12, and 25 years. Needless to say, they were absolutely to die for. For our last tasting, we were served the 12 year balsamic drizzled on top of vanilla gelato. (Now you see where I am going with this....)

I have always loved balsamic vinegar, but having it on top of vanilla gelato it is a whole different ball game. This quickly became one of my favorite desserts, so while I was totally knocking this whole olive oil cake thing, I realized the following:

1. Gelato + Balsamic vinegar= delicious.
2. Olive oil + Balsamic vinegar= delicious.

Therefore..... yep. It's all happening.

This cake is not too sweet and perfectly tender. The olive oil contains natural emulsifiers, which improves the cakes moisture and texture. It is absolutely delicious on it's own, or amazing topped with fresh fruit, ice cream, or whipped cream. It can really be the perfect base for just about any topping! My only tip is to be patient, when I say to mix for 10 minutes, mix for the full 10 minutes. You will end up with a deliciously dense and extremely moist cake!

Torta all' Olio di Oliva

Ingredients:
8 tablespoon unsalted butter (1 stick) at room temperature
1 cup all purpose flour
1/2 cup whole wheat pastry flour (or you can use only all purpose flour)
1 1/2 cups sugar
2 large eggs
1/2 cup good quality extra virgin olive oil
1 cup 2% milk
1/2 teaspoon baking powder
1/2 teaspoon kosher salt

To serve: 
Vanilla gelato 
Balsamic reduction


Method:
Grease an 8 inch cake pan and preheat your oven to 300 degrees with a rack placed in the middle. 

In the bowl of a stand mixer, combine the butter and sugar and whisk until light and fluffy,  about 10 minutes. Add the eggs, one at a time, mixing until just combined. With the mixer running on medium speed, add the olive oil in a steady stream and then continue mixing for another 10 minutes. 

Sift together the flour, salt, and baking soda. Add one third of the flour mixture to the egg mixture and mix to incorporate the ingredients. Then, add one third of the milk, followed by another third of the flour mixture. Mixing until just combined each time. Repeat this pattern until all ingredients are combined and then mix on medium speed for another 10 minutes. 

Pour the batter into the prepared cake pan and bake for about 40 minutes or until the top is browned and the edges of the cake are starting to pull away from the sides of the pan. Transfer to a cooing rack and let cool. 

To serve, dust the cake with confectioner's sugar and cut into slices. I topped the cake with vanilla gelato and a balsamic reduction (or a balsamic glaze which can be purchased at most grocery stores if you do not want to make it your self.) This cake is also amazing with fresh fruit and whipped cream!


(Read more about our trip to Modena HERE.)

Saturday, April 5, 2014

Funfetti Birthday Cake Ice Cream

I'm not really a birthday cake person. I know, I have lost my mind. Here's the thing... to me, the best part of birthday cake is the ice cream that goes on top. So, obviously the best and most logical thing to do is mush them both together (frosting, sprinkles, and all!) and make, well, for lack of a cooler thing to say.... a party... in your mouth! I am so serious. This is so good. 


Ingredients:
2 cups heavy cream
1 cup whole milk
3/4 cups sugar
2 tsp vanilla
1 tsp salt
2 cups funfetti cake, baked according to boxes instructions and broken into small pieces (not crumbs)
3/4 cup vanilla frosting (I used pink because it is pretty!)
1/2 cup rainbow sprinkles

Method:
In a mixing bowl, combine 2 cups cream, salt and vanilla. Set aside. 
In a small saucepan, combine sugar and 1 cup milk. Stir constantly over medium heat until sugar has dissolved. Cover with plastic wrap and place in fridge for 2-3 hours until cooled. Once the mixture has chilled, follow the instructions of your ice cream maker to make the base ice cream. With 5 minutes left of churning, add in your sprinkles.

Meanwhile, put your icing into a pastry bag with any sized tip you like. Once your ice cream is done, gently stir in your chunks of cake. Spoon one layer of ice cream into your container. Then, add one layer of frosting from your pastry bag. You'll be doing 3 layers total so make sure you only use about a third of your frosting. Repeat with a layer of ice cream. And a layer of frosting. Add your last layer of ice cream and top with your last layer of icing.

Freeze for 2 hours (more for firmer ice cream) and enjoy!


Wednesday, January 15, 2014

Dark Chocolate Spelt Brownies

We are just over two weeks into 2014 and I must say, I am doing some really impressive things this year. Things like going to bed a little bit earlier, eating a little bit healthier, and drinking a little less... Like almost 1/2 a glass less, per day! Also, in an effort to find my long lost abs, I've started doing Pilates... ok, I'm only two classes in, but how many have you done this year!? And, get this, I have even started washing my face before bed. Maybe it was kind of gross that I didn't already do that, but that's beside the point. My point, my as ever, long winded point, is about making good decisions. But, here's what you have keep in mind: Good decisions are actually bad decisions if they are not as much fun as the bad decisions. Which mean if good decisions can become bad decisions they are actually good decisions because... Oh my God I've gone cross-eyed. This is why I can never watch "Back To The Future."

Now, lets put today's lesson into food terms, which are the best terms.

Bad decision: 
Coming home from Pilates and eating a brownie.

Look, I am all for indulging, but that brownie just negated my entire workout that was hard enough to drag myself to in the first place.

"Good" decision: 
Coming home from Pilates and eating some stupid boring greek yogurt or protein bar thing that leaves my mouth tasting like monohydrogonatedmadeupfoodstuff and still craving that damn brownie.

Best decision:
Coming home from Pilates and indulging in a brownie that actually tastes as good as the real thing, but has just a hint of nutrition. Not a healthy brownie, but a browny with a hint of health, a whisper of well-being. I am not talking about some disgusting, cardboard resembling, makes you want to puke brownie. I am talking about a brownie that actually tastes as good as the real thing, made with real ingredients, with real names and that has some whole grain goodness!

Yes I said whole grains! More specifically: spelt.

Now, you may remember spelt because that's how your "special" friend in elementary said and spelled "spelled." Or, hopefully, you remember it from the best ever peanut butter cookies that you can find the recipe for HERE. Spelt is a relative of wheat, so, while it is low glycemic, it is not gluten free (which unless you're celiac, doesn't matter. Sorry, hip actresses.). Spelt is, however,  packed with nutrients that regular old white flour is stripped of when it is bleached and processed (like manganese and fiber). And, if you've ever eaten Cheerios, you will know that whole grains are good for your heart. Duh!

Thankfully, switching spelt for regular white flour is not like switching it out for whole wheat flour. That would be a BIG mistake. Whole wheat flour tastes a little bit like burnt chalk, while spelt flour has a toasted, nutty flavor... kind of like walnuts!

Ok, sales pitch complete. Go buy some spelt flour (I always buy this one) and get baking! And for the record... I'm not saying to eat a brownie every day after your work-out, because, let's be honest, those LuluLemon pants will not make your ass look good for very long. And while these brownies are high fiber, they do still have butter and sugar in them... I am not some hot ginger wizard. But, I do believe that everything in moderation is a-ok and, eating cardboard is just going to leave you with a raging sweet tooth anyways!

Dark Chocolate Spelt Brownies


Ingredients:
1 stick unsalted butter
1 1/2 cups bittersweet chocolate, chopped (about 6 ounces)
1/2 cup granulated sugar
1 cup brown sugar
3 large, organic eggs
1/4 cup unsweetened cocoa powder
1/2 teaspoon coarse salt
1/2 teaspoon pure vanilla extract
3/4 cup spelt flour


Method:
Preheat your oven to 350 degrees.

In a heatproof bowl, combine chocolate and butter and whisk over a saucepan of simmering water until melted and smooth. Remove from the heat and whisk in sugars. Whisk in eggs one at a time, until combined. Mix in cocoa, salt, vanilla, and then the spelt flour.

Pour batter into a greased 8x8 baking dish and bake for 35 minutes or until a toothpick comes out clean when inserted into the middle. Let cool completely before cutting and enjoying... and I mean REALLY enjoying.

Makes about 16 brownies.


Tuesday, October 1, 2013

Classic Glazed Doughnuts

Today was laundry day... my absolute least favorite day. 

I really hate doing laundry for three reasons: 
1. I hate washing my laundry. 
2. I hate folding my laundry. 
3. I hate putting away my laundry. 

Yes... I believe that covers it. You see, when I was 22, I used to really like doing laundry because I thought that one day some boy would sweep in and marry my ass for being such a good wife. But, then I got married, realized that boys can be distracted with other things that make me an even better wife, and decided that I really, REALLY hate doing laundry. I am a feminist's worst nightmare. 

So, how do I make laundry day bearable? With projects. 

A few weeks ago my project was cleaning out my closet and boxing up all my clothes that I swore I would wear again 5 years ago for charity (or my sister...) Today my project was doughnuts. 

I don't really like doughnuts, but I like them better than doing laundry and they make my house smell good. Plus, tomorrow is fried chicken night and lord knows when I get that deep fryer out, I really go for it... so I did. I went for it. My house smells like a Krispy Kreme, my clothes are clean, and my husband is happy... in all of the ways. 


doughnuts.


Ingredients:
1 tablespoon plus 1 teaspoon active dry yeast
1 cup whole milk, heated to 110°F
2 to 2 1/2 cups bread flour
1 teaspoon pure vanilla extract
3 large egg yolks
2 tablespoons sugar
1/2 teaspoon table salt
4 tablespoons (1/2 stick) unsalted butter, softened at room temperature and cut into cubes
Vegetable oil for frying

Special Equipment: 
Stand mixer, deep fryer, wire cooling racks

Method:
In a medium bowl, combine 1 tablespoon of the yeast with 3/4 cup of the warm milk and stir to dissolve the yeast. Add 3/4 cup of the flour and stir to create a smooth paste. Cover the bowl with plastic wrap and let the flour mixture rest in a warm place for 30 minutes.


Once 30 minutes have passed, in the bowl of a stand mixer fitted with the paddle attachment, combine the remaining 1 teaspoon yeast with the remaining 1/4 cup milk (the milk will be room temperature at this point). Add the rested flour mixture along with the vanilla and egg yolks and mix on low until the ingredients are incorporated and the dough is smooth, about 30 seconds. Turn off the mixer and add 1 cup of flour, along with the sugar and salt. Mix on medium until the dough starts to come together, about 30 seconds. Add the butter and mix on medium until it's incorporated, about 30 seconds.

Remove the paddle attachment from the mixer, and switch to the dough hook. Start adding the remaining flour, 1/4 cup at a time (turning the mixer off for each addition) and knead the dough on medium until it completely pulls away from the side of the bowl and is smooth and not too sticky, about 1 minute. The dough will be very soft and moist but not so sticky that you can't roll it out. (For this step, you may only need to use as little as 1/4 cup flour, so there may be flour leftover.) Cover the bowl with plastic wrap and let the dough rest in a warm place for 30 minutes.

Once 30 minutes have passed, gently press down on the dough to remove any gas bubbles then chill, covered, for at least 1 hour and up to 12 hours.

When ready to roll out the dough, line a baking sheet with a lightly floured non-terry towel. Lightly flour a work surface and roll out the dough to a 1/2-inch thickness. Using doughnut or cookie cutters, cut out 3-inch-diameter rounds with 1-inch-diameter holes. (For filled doughnuts, don't cut out the holes.) Arrange the doughnuts on the prepared baking sheet, leaving at least 1 inch between doughnuts. Cover the doughnuts loosely with plastic wrap and let them proof in a warm place until almost doubled in size, 30 to 40 minutes. Check to see if the doughnuts are ready every 5 to 10 minutes. To test, use a fingertip to lightly touch one of the doughnuts. If the dough springs back immediately, it needs more time; if it springs back slowly, it's ready; and if the dough doesn't spring back at all, it's over-proofed. You can punch down and reroll over-proofed dough once.

While the doughnuts are proofing, line a baking sheet with 2 layers of paper towels and place a wire rack on top of the towels. In a heavy-bottomed large pot or deep fryer, heat at least 2 inches of oil until a deep-fry thermometer registers 360°F. Working in batches, use a slotted metal spoon or spatula to carefully place the doughnuts in the hot oil. Fry, flipping once, until light golden brown, 1 to 2 minutes per side. Transfer as done to the wire rack and return the oil to 360°F between batches. Let the doughnuts cool slightly before glazing


To make the glaze:

Vanilla glaze
1 1/2 cups confectioners/powdered sugar, sifted
2 tbsp milk
1 teaspoon pure vanilla extract 

Maple- cinnamon glaze
1 1/2 cups confectioners/powdered sugar, sifted
2 tbsp milk
2 tbsp maple syrup
1 tsp maple extract
1 tsp cinnamon

Chocolate glaze
1 1/2 cups confectioners/ powdered sugar, sifted
4 tbsp unsweetened cocoa powder, sifted
3 tbsp milk
1 tsp pure vanilla extract

Method:
Combine ingredients. Dip cooled doughnuts in the glaze and set on wire cooling racks to set. 

**a tip: do a better job sifting your cocoa powder than I did or you will have ugly, clumpy glaze. ugh. 


Recipe taken from Epicurious.com.

Saturday, September 7, 2013

Coconut & Raspberry Ice Cream (It's Vegan!)

It's hot. Like really, really hot.

Now, I know that I grew up in the hellish desert and some of you that still live in Arizona may think that I have lost my heat resistant skin, but let me tell you, I know that 112 degrees is hot. I get it. It's the desert. But do you know what else is hot? 93 degrees with 40% humidity in a 1940's building with crappy wall unit A.C. when you were born in Canada with sensitive ginger skin. Now, that's hot.

I'm grumpy. Heat waves are definitely the worst. Worse than tidal waves, that wave maker attachment for flat irons, even those waves at baseball games. Especially since I've already colored my hair for fall and I am feeling the itch to start decorating the house with my transitional gourds (these are gourds that are somewhere between summer squash and pumpkins). It should not be over 90 anymore! I want to wear boots and I really want to stop trying to convince myself that being hot and sweaty gives my skin a luminous glow, it just doesn't. It makes me look like that girl who swears she is sober enough to get into the bar...

So, after a night of violently throwing my blankets to every corner of my our bedroom as I tossed and turned without a wink of sleep (Rich slept peacefully, his neuroses confined to his dreams), I woke up all hot and sweaty (in the non-sexy way, did I mention Rich was sleeping?) and went straight for the internet. The only thing on my mind? Popsicles. I came across a recipe from Spoon Fork Bacon and would have started jumping up and down with excitement if it wouldn't have landed me near death with heat exhaustion. I mean, raspberry and coconut.... IN A POPSICLE? I love all of those things. But then it hit me.... popsicles take time. A lot of time. You have to wait for those frozen bitches to freeze and that can take hours... at this point I was pretty much about to burst into flames at any second (let the ginger jokes begin), like Eric suntanning on that mountain in True Blood. My point is... who has time to wait for popsicles to freeze?!

Man, my morning was pretty dramatic....

Once I turned the A.C. on and was able to think clearly, I realized that, while popsicles were not a convenient option for me at this time, there is always a frozen dessert that I can count on. Ice cream.


coconut & raspberry ice cream


Ingredients:
2 cans coconut milk
3/4 cup granulated sugar
1 tsp pure vanilla extract
1/4 cup shredded coconut
1 cup fresh raspberries


Method:
Combine the coconut milk, sugar, vanilla, and coconut. Freeze in an ice cream maker according to manufacturer's instructions. While the ice cream is churning, slightly crush some of the raspberries and then a few minutes before you are done churning the ice cream, add the raspberries and let them swirl through the ice cream. Enjoy!


Wednesday, August 21, 2013

A Perfectly Messy Apple Galette

Some things in life are better a bit messy. I know, this may be shocking coming from one of the most OCD people ever, but let's discuss.... actually, speaking of OCD, let's make a list.

Things that are better messy:
Hair- Besides the fact I hate showering, I really do think a little bed head looks good on everyone.
Beds- Seriously, you are going to sleep in it in about 12 hours, unless you are having a bedroom party (which I've never done and won't be doing again on Sept. 21st, MOM!)
Dogs- I say this only because I am giving myself a free pass for never washing mine... and because our friend Pat's dog Bosworth is always smelly and I love him.
Tupperware drawers- There's lots of fun reasons to bend over. Cleaning a drawer is not one.
Beards- My husband, Marc Ruffalo (Not necessarily in that order.)
Purses- Please let me know if you are the one woman alive that keeps hers clean, so I can beat you to death with my filthy fifty pound purse
Food- Keep reading, you'll see...

Let's be honest, I don't even have kids yet (except our roommate, Michael) and I can barely keep my house clean..... So, I think it is completely safe to say that maybe everything (except hardwood floors) is better a little bit messier..... Especially food.

When I was at Le Cordon Bleu I used to lose points all the time because my plating was "too rustic." I'm sorry, we're talking about food here and unless you are some kick-ass chef that plates food like a boss, I feel like everyone can appreciate a good rustic, family-style meal. So, dear Le Cordon Bleu, get over yourself. You make people go to college in a shopping mall. Thanks. (End rant.) Anyways, as much as I can appreciate a perfectly lattice topped pie, I think that there is something just as perfect about a messy pile of apples, wrapped in a piece of dough, without a baking dish and without any regrets. Yes, I just anthropomorphized my messy pie. (And yes Richard told me what that word meant.) So, since I'm a mess, I like things messy, and it's almosssssst apple time (holy moly, fall is on its way!) I figured that we could get a head start on an apple recipe that's perfect in its own messy way.... just like my hair today.

 A Perfectly Off-Centered Apple Galette.

Galette is a French term to describe flat, free-form, crusty pies. (Can you tell I just googled that for you?) They are simple to make because you don't have to fuss with a perfect crust. Just wrap up your apples, throw them in the oven, and quite honestly, if the juices run or the edges get crumbly... your pie will look even more charming.
 
Ingredients:
1 1/4 cups unbleached all-purpose flour
1 Tbs. sugar
1/4 tsp. salt
8 Tbs. (1 stick) cold unsalted butter, cut into 1/4-inch cubes
3 Tbs. very cold water
4-6 granny smith apples, cored, sliced, peeled if you want
3 tbs sugar
1/2 tsp ground cinnamon
Zest from 1 lemon
1 egg white for egg wash
A little extra sugar for sprinkling, preferably the course kind for pies (this is completely optional!)

Method:
Preheat your oven to 400 degrees.

Make your pie dough. Or you can buy it... you know I don't judge. I actually made my dough this time (shocker!) and it turned out great, so I believe in you.

To make the dough by hand, in a large bowl, stir together the flour, sugar and salt. Cut the butter into the flour mixture until the texture resembles coarse cornmeal... I always use my hands for this... it's way easier and then you can get a feel for the dough. Wash your hands first, thanks. Add the water and mix with a fork just until the dough pulls together.

To make the dough in a stand mixer, fit the mixer with the flat beater, and stir together the flour, sugar and salt in the mixer bowl. Add the butter and toss with your hands (or a fork) to coat with the flour mixture. Mix on medium-low speed until the texture resembles coarse cornmeal, with the butter pieces no larger than small peas. Add the water and mix on low speed just until the dough pulls together.

Transfer the dough to a floured surface and roll out to a 10 inch round.


For the apples, once they are cored and sliced (I didn't bother peeling mine, this is a rustic tart after all) mix them with the cinnamon, sugar, and lemon zest. Then place them in a pile in the middle of the dough. If you want to, you can arrange the top apples in a circle since you will see them once your galette is baked.  You should leave about 2 inches of dough around the edges. Take the edges of the dough and carefully fold them over the edges of the apples. The key word here is carefully.... trust me.... if your dough rips, it is a pain in the ass. Butttttt, it is not the end of the world, just press it back together and try folding the dough over the apples again. You can do it.

Brush the crust with the egg wash and bake on a parchment paper lined tray for about 40 minutes, turning every 15 minutes or so, until golden brown. Remove from the oven and let stand for 15 minutes before serving with vanilla ice cream or lightly sweetened whipped cream.


This recipe is dedicated to my sweet friend Jenapher with whom I used to cause lots of ruckus in my high school years. She now has baby number two on the way (eee congrats!) and is about to harvest her apple tree!! I am on dog number four and still trying to figure out how to stop them from barking. Ugh! But we did get a big harvest of concord and muscat grapes this year!

Wednesday, July 31, 2013

When life gives you scrapes, cuts, and bruises.... make CHOCOLATE ICE CREAM!

My titles are just getting longer and longer....

I am not known for being the most graceful woman (or even one of the top 10). So, as much as my mother tried to give me grace with the 10 years of ballet classes she put me through (see flat, even length toes below), not much stuck... except band-aids, thank god. On any given Wednesday, you will most likely find me with at least one bruised knee, a few cuts, and a couple scrapes. (Congratulations, Rich, you married a 3rd grader.) So what about today, you may ask? Today is just like any other Wednesday.

- I ran into MY OWN shopping cart at Whole Foods this morning (yes, that is actually possible) and did quite the sexy little number on my chicken nugget toe (fun fact: contains as much actual chicken as a McDonald's Chicken McNugget.)

- I sliced my thumb on my mandolin. (the kind for slicing, not the Asian string instrument)

- I gave myself a paper cut with a CARDBOARD BOX! (WTF? It's not even paper!!!)

- And I burnt my hand on a hot bowl that ended in broken China everywhere and a whole big mess. At least the dogs were happy. (No they didn't eat the China)


Oh, and this was all before 10:00am.

So, yes. That has been my day so far. And when life gives you lemons all of the ridiculous things above, there is nothing else to do but make lemonade ICE CREAM!


chocolate ice cream (in a grown up cone...)


As many fancy-shamncy (kinda douchey) ice cream flavors as a girl can come up with, there's nothing better than the originals. Chocolate ice cream and I go wayyyy back... even before all of those useless ballet classes... and we are still going strong. This is another eggless recipe because I care about your heart and my mother-in-law, Cindy (she has an anaphylactic egg allergy, poor woman.) But trust a ginger when I say, you won't miss them one bit!


Ingredients:
1 cup cocoa powder (I used Ghirardelli sweet ground chocolate)
3/4 cup brown sugar
1 3/4 cup whole milk
3 cups heavy cream
1 tablespoon pure vanilla extract

Method:
Combine all ingredients, try not to hurt yourself, and churn in an ice cream maker according to manufacturers instructions. Store in an airtight container in the freezer (duh.)

Look, it's my ice. creaming!


Wednesday, July 24, 2013

Fresh Mint Chip Frozen Yogurt

I always joke that I eat ice cream for breakfast, but I never actually have.... until today. I dunno. I woke up to a hot apartment and it just really seemed like acceptable behavior. Plus, Rich's back is still hurting and he's being a total baby about it, so I figured if he can act like a child, I can eat breakfast like one. So after I made Rich some eggs....... and I had a bowl of ice cream like a fat kid pretty girl. 

Here's the thing.... you know how sometimes, oh, I dunno..... they put an egg on a bacon cheeseburger so your husband is like "this is an acceptable breakfast sandwich.... theres AN EGG on it!" That is how I felt about this ice cream.... IT HAS GREEK YOGURT IN IT! This means three things:

1. Anything with REAL yogurt in it is automatically healthy*
2. Anything that is healthy is a great breakfast food. 
3. Frozen yogurt is an acceptable breakfast food. 

I know, I know- best use of PROOFS ever. Remember high school geometry? Who says that shit doesn't come in handy one day. (Hannah, stay in school. Being pretty isn't a career. Wait... Marco says it is.) So, in order to make this proof true, I'm blogging a recipe about it. Because even if you don't believe in math and science, everyone knows that if you blog something, it has to be true. (Seriously, stay in school, Hannah.)

*While this statement may be fact to me... it is not actually fact and should not be taken seriously. 


fresh mint chip frozen yogurt photographed in porcelain ice cream cones
 from anthroplogie. are they serious with these? best invention ever. best purchase ever.


Ingredients:
I cup fresh mint leaves, chopped
1 cup heavy cream
1/2 agave nectar 
3/4 teaspoon organic peppermint extract
2 cups greek yogurt (I used 2%, not whole milk and it turned out great)
2 ounces mini chocolate chips

Method:
Combine the chopped mint leaves and the cream in a saucepan and bring to a simmer over medium heat. Once the cream is simmering, add the agave nectar and remove from heat and let steep for 30 minutes. 

Once cooled, pour the cream through a sieve to remove the mint leaves and then combine with the greek yogurt and peppermint extract. Refrigerate the mixture for at least 30 minutes, or until chilled, and then churn in an ice cream maker according to manufacturer's instructions. When the yogurt is just about finished churned, add the chocolate chips. 

Store in an airtight container for up to a week. Makes 4-6 servings.


Inspiration from Sprouted Kitchen by Sara Forte.


Friday, July 19, 2013

Savory Fig Jam and a Cheese Board for Two

You know those days when you could sit outside all day long, wine in hand, and just eat copious amounts of cheese until your arteries literally stop working? That is every day for me. If I could only have one thing to eat for the rest of my life it really would be cheese. 


So, yesterday, due to whatever political argument was ailing me at the time, I was daydreaming that Richard and I (and the 4 dogs, of course) were moving to France.... when I really got to thinking....these people know what the F is up. They drink wine (maybe even more than I do) they wear horizontal strips (which are my favorite) and I am sure that they have probably given cheese it's own food group. French women never get fat, they always look classy, and I feel like they would be much more accepting of whatever shenanigans that second glass (bottle) of wine got me into. 

Need I say more?

No. Moving to France was officially the best idea I have EVER had (as of yesterday.) So before I started looking at apartments for rent, preferably right next door to a quaint boulangerie, it seemed only fair to inform my darling husband of our new life path. Unfortunately, let's just say he was less than thrilled with the idea. Even less thrilled than when I also explained to him why turning our deck into a sandy beach was an absolute MUST for our next BBQ.... but that's a whole other story.  Anyways, while he was a bit under enthused with us moving to France for silly reasons like our careers, money, and family....... being the absolute dreamboat that he is,  he ran to the market, got every kind of amazing cheese possible, picked a perfect bottle of french wine and we are calling it a day. Did I marry well, or what? 

I obviously put on my best horizontal stripes, thanked god I just cut my hair into a bob, and broke out my favorite cheese board. Now, trying to keep in theme with "fig week" I figured this the perfect time to make my absolute favorite fig jam. It's savory, delicious, and pretty quick to make. It also calls for dried figs, so you can make it any time of the year. I actually made this recipe for our engagement party (almost 2 years ago- gasp!) and it was quite a hit!


a modest cheese board for two with savory fig jam


Ingredients:
3 tablespoons minced shallots
2 fresh thyme sprigs plus 1/2 teaspoon minced fresh thyme
1 small bay leaf

1 1/2 tablespoons unsalted butter
3/4 cup dried black mission figs
3/4 cup port
1 tsp kosher salt
1/2 tsp black pepper


Method:
Cook shallot, thyme sprigs, and bay leaf in butter in a 1- to 1 1/2-quart heavy saucepan over moderately low heat, stirring, until shallot is softened, about 2 minutes. Add dried figs, Port, salt, and pepper and bring to a boil. Simmer, covered, until figs are soft, about 10 minutes. If there is still liquid in saucepan, remove lid and simmer, stirring, until most of liquid is evaporated, 3 to 4 minutes more. Discard bay leaf and thyme sprigs and transfer jam to a bowl. Cool, then stir in minced thyme and salt and pepper to taste.


Serve on toast, make crostinis, or put a dollop of it right on a cheese board like I did. 


Au revoir!